Renter Security System: A First-Week Buying Checklist
A renter security system should protect the entry points you actually use without forcing permanent changes, an oversized kit, or a contract you did not intend to keep. During your first week, focus on the door, accessible windows, account security, connectivity, and a clear response plan before buying extra devices. The best setup is not the one with the most sensors; it is the smallest system that fits your lease, layout, privacy preferences, and willingness to monitor alerts.
What a renter security system should do
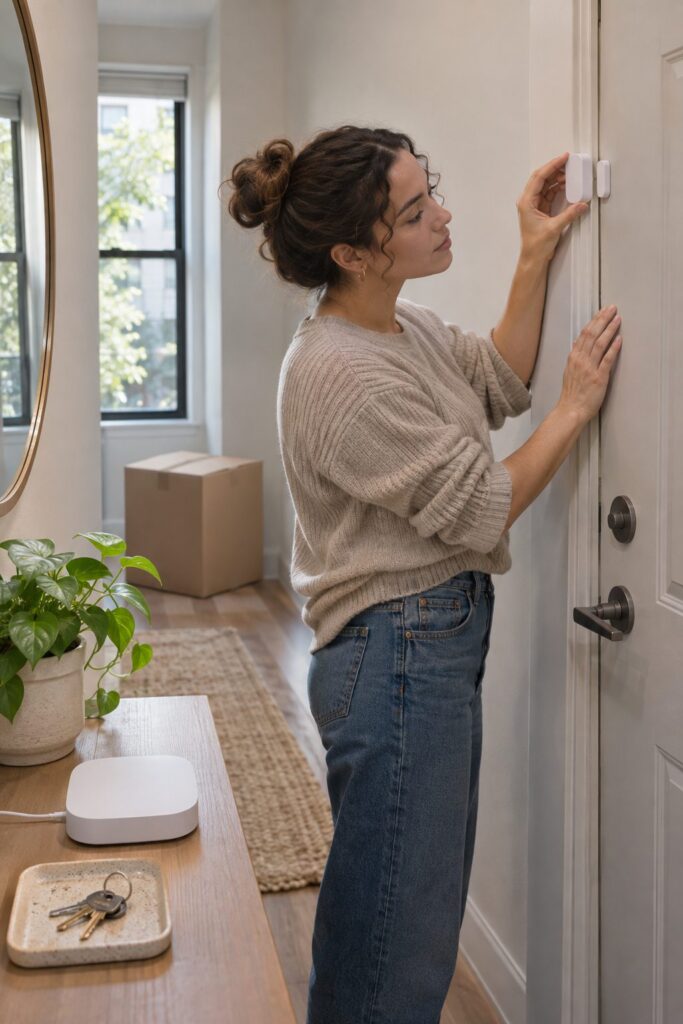
Start by defining the problem instead of shopping by brand. In a studio, one exterior door and one accessible window may be the only openings that need contact sensors. In a larger apartment, a balcony door, patio window, garage entry, or shared hallway may change the plan. If you share the home, the system also needs an alert and access policy that every resident understands.
A practical renter setup usually needs to do four things: detect an unexpected opening, send an alert to the right person, remain usable during a move, and avoid interfering with a safe exit. Cameras are optional. They can add visual verification, but they also create privacy, placement, storage, and account-security decisions that a simple contact-sensor system does not.
Before adding hardware, organize the entrance so bags, shoes, and furniture do not hide a sensor or narrow the path. This small-apartment entryway storage guide can help you create a clear landing zone without turning the doorway into another crowded storage wall.
Compare the main renter security options
| Setup | Best fit | Main tradeoff | Verify before buying |
|---|---|---|---|
| Local door or window alarm | One or two entry points and no app requirement | May make noise without notifying you remotely | Alarm control, battery type, mounting method, and reset process |
| Self-monitored wireless kit | Renters who will respond to phone alerts themselves | Depends on your phone, account, network, and response habits | Required hub, app permissions, alert delay, battery backup, and subscription limits |
| Professionally monitored system | People who want a monitoring center involved when an alarm triggers | Monthly cost, cancellation terms, permits, and false-alarm rules may apply | Contract length, total equipment cost, address changes, trial period, and local requirements |
| Camera or video doorbell | Visual verification at a specific door or indoor zone | Privacy, recording, cloud storage, field of view, and neighbor concerns | Encryption, update support, MFA, storage fees, mounting permission, and recording area |
Use this first-week setup order
Map the apartment before choosing a kit
Walk the unit and list every door and window that a person could realistically reach from outside or a shared area. Note which entrance you use daily, where packages are left, and whether the building already controls exterior access. Do not assume that more sensors automatically provide more value. Cover the highest-priority openings first, then add devices only when a specific gap remains.
Read the lease and building rules
Look for rules about drilling, exterior door changes, smart locks, doorbell cameras, hallway recording, adhesive mounting, and alterations to building hardware. Ask management in writing when a planned device touches a door, frame, common area, wiring, or existing lock. Keep the response with your lease records. If your paperwork is scattered, use this lease document checklist before installation day.
Do not assume a product marketed as “renter friendly” is automatically permitted in your building. The lease, building policy, local rules, and the actual mounting method still control what is appropriate for your unit.
Choose self-monitoring or professional monitoring
Self-monitoring means you receive the alert and decide what to do. It can fit people who reliably keep their phone charged, notice notifications, and have a trusted backup contact. Professional monitoring adds another response layer, but you should read the service agreement closely. Compare monthly cost, cancellation, moving procedures, cellular backup, test periods, and what happens when the provider cannot reach you.
Write down who responds to which alert, especially in a shared apartment. A simple renter emergency contact list prevents roommates from improvising during a stressful event.
Check power and connectivity
Identify which parts use batteries, wall power, Wi-Fi, a hub, cellular service, or a combination. Ask what still works during an internet outage, a power outage, or a disconnected phone. Check the manufacturer’s current documentation for battery replacement, update support, compatible Wi-Fi bands, and backup behavior. Avoid hiding a hub inside a metal cabinet or placing it where daily clutter can unplug it.
Secure the accounts before adding more devices
The Federal Trade Commission recommends changing default router settings, using unique passwords, enabling available multi-factor authentication, checking for updates, and reviewing device security features. The FTC also advises camera buyers to research encryption and update practices before purchasing. Complete those steps before inviting roommates, family members, or service providers into the account.
Use separate logins when the service supports them instead of sharing one password. Review who can see live video, saved clips, alert history, and location information. Remove access promptly when a roommate moves out or a temporary guest no longer needs it.
Install without creating an exit problem
A device should not slow anyone who needs to leave quickly. The U.S. Fire Administration advises households to identify two ways out of every room and keep doors and windows used for escape unblocked. Do not place furniture, boxes, cables, a hub, or a removable door device where it narrows the route, catches clothing, or makes the lock confusing to operate from inside.
After installation, open and close the door normally, use the lock from inside, carry a bag through the entrance, and confirm that every resident can leave without finding a tool, app, key, or special instruction. Security hardware that delays an emergency exit is not a useful upgrade.
Test the full response, not only the sensor
Trigger each contact sensor, motion detector, camera alert, and siren according to the manufacturer’s test process. Confirm which phones receive alerts, how quickly they arrive, whether quiet modes suppress them, and what happens when Wi-Fi is unavailable. If professional monitoring is active, follow the provider’s test procedure so you do not create an unnecessary dispatch.
Save model numbers, purchase dates, subscription terms, support contacts, and battery types in one household record. Set a realistic reminder for battery and account review rather than relying on memory.
A renter security system buying checklist
- List the exact doors and accessible windows you want to cover.
- Confirm whether the lease or building requires written approval.
- Separate equipment cost from monthly monitoring and storage fees.
- Check whether essential alerts work without a paid plan.
- Verify hub, Wi-Fi, phone, and operating-system requirements.
- Review battery life claims and the real replacement battery type.
- Look for a clear software-update and support policy.
- Confirm encryption and multi-factor authentication options.
- Check how household members receive separate access.
- Understand moving, cancellation, return, and warranty terms.
- Choose a mounting method that matches both the surface and the lease.
- Make sure the device does not block an exit or change a required lock.
Privacy and camera placement require a separate decision
A camera is not simply another sensor. It may record conversations, roommates, children, visitors, neighbors, or a shared hallway. Decide whether visual verification is necessary before placing one. If a contact sensor and siren solve the problem, a camera may add more data than value.
If you choose a camera, frame only the area you need, review motion zones, disable features you will not use, and check retention settings. The FTC recommends securing the home network, keeping camera software and viewing apps updated, using a strong unique password, and enabling available security features. Also review the manufacturer’s privacy policy and its process for downloading or deleting recordings.
Common mistakes that waste money
- Buying a large bundle first: Start with the primary entry and add only what solves a documented gap.
- Comparing only hardware prices: Include monitoring, video storage, replacement batteries, hubs, mounts, and cancellation costs.
- Trusting “no-drill” language without checking the surface: Adhesive performance and removal risk vary by paint, finish, temperature, and installation instructions.
- Ignoring account recovery: Confirm the recovery email, phone number, MFA method, and backup codes before an emergency.
- Placing a camera before discussing privacy: Roommates and visitors should not discover the recording plan by accident.
- Blocking the entryway with the setup: Keep the path, lock, handle, and escape route simple to use.
- Skipping a move-out plan: Know how to remove mounts, transfer service, delete old addresses, and revoke access.
When professional monitoring may be worth comparing
Professional monitoring can be useful when you travel often, cannot reliably watch phone alerts, want a backup response layer, or need a system with cellular communication during an internet outage. It is not automatically the right choice for every renter. Read the current agreement and compare the complete cost over the time you expect to live in the unit.
Frequently asked questions
Can I install a renter security system without drilling?
Many wireless sensors and some camera mounts offer removable installation methods, but the correct answer depends on the product, surface, lease, and building rules. Read the manufacturer’s instructions and get written approval when a device touches a door, frame, common area, existing lock, or building wiring.
Do I need professional monitoring in an apartment?
No. Self-monitoring may be enough if you reliably receive alerts and have a clear response plan. Compare professional monitoring when you want a separate monitoring center, cellular backup, or help managing alerts while away. Review total cost, cancellation, moving terms, and local requirements before subscribing.
Should I put a camera inside a shared apartment?
Only after deciding that visual verification is necessary and discussing placement, access, recording, and retention with everyone who lives there. A door or window sensor may solve the immediate problem with less privacy impact. Secure any camera account with a unique password, updates, and available MFA.
What should I test after installation?
Test every sensor, siren, phone alert, household account, battery warning, and backup connection using the manufacturer’s test instructions. Confirm that the front door and every escape route remain easy to use from inside. If the system is professionally monitored, use its official test mode or contact procedure.
Sources and fact-checking
- Federal Trade Commission: Securing Your Internet-Connected Devices at Home
- Federal Trade Commission: How To Secure Your Home Security Cameras
- U.S. Fire Administration: Home Fire Escape Plans
Fact-checked November 10, 2026. Product features, subscription terms, lease rules, and local alarm requirements can change. Verify the current manufacturer documentation, your lease, building policy, and local requirements before purchasing or installing equipment.