How to Set Up a Shared Rental Kitchen With Clear Personal Zones
Sharing a small rental kitchen can turn morning routines and weeknight meals into friction points when food, pans, and cleaning supplies overlap. The problem is usually not bad intent but unclear boundaries and no quick way to tell what belongs to whom.
This article shows a renter-friendly approach that uses clearly labeled, agreed zones for daily food, cookware, cleaning items, and a small shared-staples area. The outcome: faster routines, fewer missing pots, and a simple process you can change if the household changes.
Start with the real constraint
The real constraint in most shared rental kitchens is space: limited cupboards, one fridge, and often no extra counters. Because storage is scarce, zones must be compact, consistent, and easy to follow day to day.
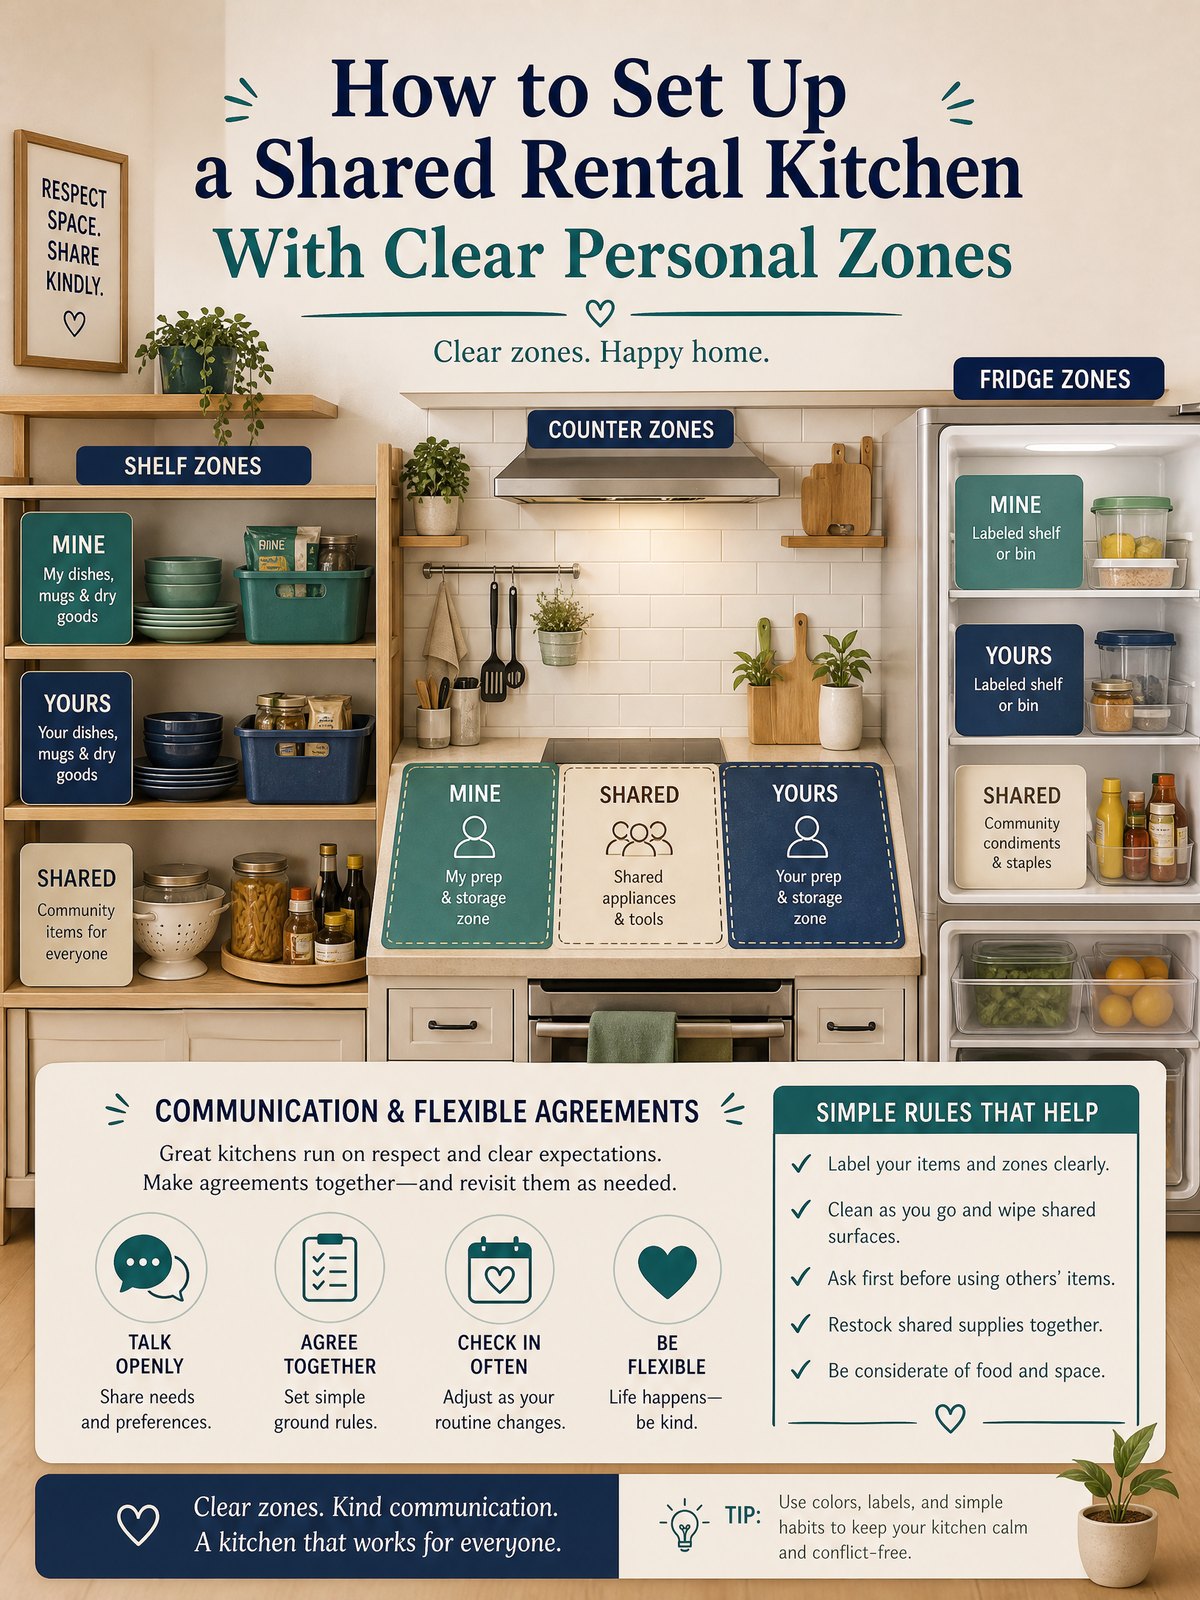
Zones are a practical option that let each person keep a small, fixed footprint for their daily items while preserving a tiny shared area for basics. Zones work best when agreed on in advance and written down so there’s no guesswork about where items should be returned.
At-a-glance plan
| Zone | Who decides | Action & timing |
|---|---|---|
| Personal fridge shelf & drawer | Assigned by mutual agreement | Label space; clear weekly; follow FoodSafety.gov guidance for perishable storage. |
| Personal cookware drawer or shelf | Owner chooses what fits their footprint | Keep everyday pans here; return after each use; rotate bulky items out if space is needed. |
| Shared staples cabinet | Group decides shared list | Limit to 6–8 items (oil, salt, sugar, coffee, etc.); replace or contribute when used to an agreed threshold. |
| Cleaning supplies station | Landlord rules and household agreement | Store in a single low cabinet or caddy; follow product labels and CDC guidance on cleaning vs. disinfecting. |
Build the system step by step
- Hold a short kickoff meeting: map the cupboards, fridge, and drawers in five minutes and note obvious constraints (no deep shelves, one pantry, etc.).
- Sketch zones and assign small permanent spots: one shelf in the fridge per person, one drawer or shelf for cookware, one cabinet for shared staples, and one place for cleaning supplies.
- Label and size the zones: use removable labels, shelf liners, or a piece of colored tape to mark exact boundaries so everyone returns items to the right place.
- Create simple rules for shared staples and replacements: list what the group considers shared and how to handle running out (replace, split cost, or record on a note).
- Agree a weekly five-minute check: quick tidy, trash takeout coordination, and fridge clear-out to remove spoiled perishables using the official storage chart as needed.
After these steps, keep the initial meeting notes where everyone can see them (on the fridge or a shared photo). Treat this setup as a flexible, practical option: adjust shelves and shared items if someone’s needs change or if storage is reconfigured by the landlord.
Trade-offs to consider
Every division of space accepts trade-offs between privacy, convenience, and shared cost. Decide which matters most for your household before insisting on strict rules.
- Privacy vs. economy: Larger personal zones increase privacy but reduce the amount of space for truly shared items.
- Convenience vs. control: Central shared staples are convenient but require clear rules to avoid free-loading or resentment.
- Low-maintenance vs. precision: A loose arrangement is easy to start; a stricter labeled system reduces disputes but needs upkeep.
Keep it workable
Maintenance is the difference between a tidy shared kitchen and recurring friction. Set a realistic rhythm: a five-minute weekly check, a single monthly “use-it-or-lose-it” fridge clear-out, and a rule that cookware returns to its assigned spot immediately after washing. If anyone’s relationship to the space changes—moving out, long trips—reconvene and reassign spots. Always follow your lease and any building rules about storing items in common areas.
FAQ
How should we handle perishable food and the fridge?
Assign one shelf and a drawer per person and put names on them; plan a weekly clear-out for anything that looks questionable. For storage duration and safety details, use the FoodSafety.gov official chart as the source for perishable refrigerator and freezer guidance.
What cleaning products should we keep accessible?
Keep a compact caddy with dish soap, an all-purpose cleaner, sponges, and a trash-bag stash in one cabinet. Follow product labels for safe use and the CDC distinction between cleaning with soap and water and disinfecting—cleaning alone is usually sufficient unless illness-related circumstances make disinfection appropriate.
How do we prevent arguments over shared staples?
Limit shared staples to a small, agreed list and a simple replacement rule: when an item is below an agreed threshold, the user replaces it or contributes to the next purchase. A shared shopping list or a small expense app is a practical option for tracking contributions.
Pick one small change to implement tonight: label one shelf and one drawer and write the shared staples list on a sticky note. Revisit the plan in a week and tweak the zones if something consistently feels cramped.
Sources and fact-checking
This guide provides practical editorial guidance. Requirements and safe choices can depend on the product, lease, local rules, and individual situation.
- FoodSafety.gov — Cold Food Storage Chart — FoodSafety.gov provides food-specific refrigerator and freezer storage guidance and directs readers to use the official chart for details.
- U.S. Centers for Disease Control and Prevention — Cleaning and Disinfecting — CDC distinguishes cleaning with soap and water from disinfecting, and says cleaning alone is sufficient in most situations unless illness-related circumstances make disinfection appropriate.
Fact-checked against the linked official resources on August 27, 2026.